Developing Gnome Application with Python
Needed tools
A D V E R T I S E M E N T
To be able to run the program described in this article you will need at
least:
- Python 1.52 , an older version will make your Gnome-Python
development instable. If you use rpm you can find rpm packages for your
system
- Gnome Python 1.0.53;
- October Gnome;
- Glade 0.5.7
- LibGlade 0.12
- an adapted editor, for example GNU Emacs. In this case you will
want to install the Python mode
for emacs. At this location there is also explanation how to install it.
- Also you may need the original .glade file and the Python source code.
To install Pyhton-Gnome and LibGlade from the sources:
./configure
make
make install
|
will do the trick.You must also check that the Python environment variable
PYTHONPATH is set to the path where the Python-Gnome modules were
installed. This can be /usr/local/lib/python1.5/site-packages or /usr/lib/python1.5/site-packages/.
In this place you find all the necessary bindings for Gnome and LibGlade, for
example you will find the libglade.py module there. To set the
PYTHONPATH just add in your .bash_profile:
PYTHONPATH=/usr/local/lib/python1.5/site-packages
export PYTHONPATH
|
Don't forget, you may have to start your Python code from a terminal to get
this variable set.
Glade, LibGlade & Python interaction
Glade is an interface builder developed by Damon Chaplin. It allows
graphical and interactive construction of Gnome/Gtk graphical user interfaces.
From Glade, the generated interface can be saved in a xml file or directly
exported to C code to be included in a C source tree. Glade also allows to
define the name of the handlers - functions - to be attached to the various
event of the interface. For example the function (name) to be called when a
specific menu item is pressed.
LibGlade is a library written by James Henstridge to generate on the
fly an interface represented by a Glade xml file. The application just needs to
be aware of the xml file - generally ending by the .glade extension - and then
LibGlade can generate the interface from it. James Henstridge has also written
the LibGlade Pyhton binding - among others - found in the Gnome-Python package.
LibGlade also allows to auto-connect - almost in Python - the handlers defined
in the .glade file to functions defined in the Python code.
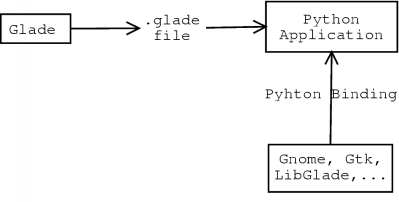
The following graph shows this general mechanism. To understand how the
Pyhton binding is implemented, it's sometimes necessary to look at the Gtk,
Gnome, LibGlade Python modules located in PYTHONPATH in order to
compare them to the C Gtk/Gnome developer documentation.
A first example named couleur
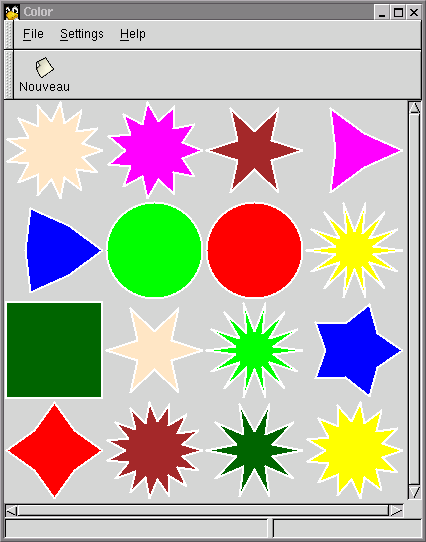
As a first approach to Gnome-Python programming, I propose a simple color
game where kids have to recognize shapes of the same color. This example is very
graphic oriented and presents nice features of Gnome such as the Gnome Canvas
and the Gnome Application Window. The rules of this game are quite simple: the
game board is filled with 16 shapes - circles, stars and squares - of different
colors. All this 16 shapes are divided in 8 pairs of identical color. To finish
the game, just select successively these 8 pairs. You might want to look first
at the code at the end of this document to get an overall idea and then resume
from here.
Building an interface with Glade
The widgets
 After starting Glade, you will get two windows. One is a widget tool box, called
Palette. Form this one you can select the categories of widget among
GTK+ Basic, GTK+ Additional and Gnome. If you don't
have the Gnome widget, Glade may have been compiled without Gnome support. Check
the configure of the source Glade package, configure --help
explains the configuration options.
After starting Glade, you will get two windows. One is a widget tool box, called
Palette. Form this one you can select the categories of widget among
GTK+ Basic, GTK+ Additional and Gnome. If you don't
have the Gnome widget, Glade may have been compiled without Gnome support. Check
the configure of the source Glade package, configure --help
explains the configuration options.
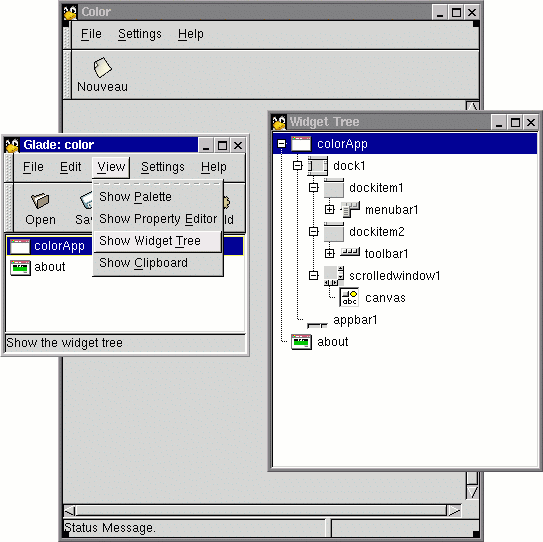
The other window lists in its main area the created widgets.
With Glade, we first create a Gnome Application Window. This widget is a
window with menu bar & tool bar. Both are packed on the handled dock. On the
bottom of the Gnome Application Window there is also already packed a status
bar. After creating a Gnome Application Window, open the Widget Tree
dialog (you will find it in the view menu in Glade). Now you can explore what is
exactly packed in this widget.
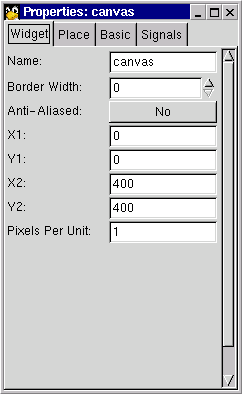
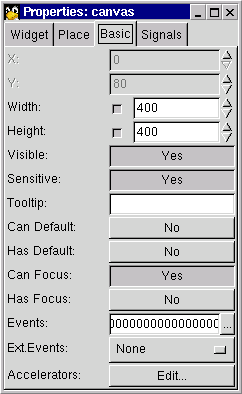
Next add a canvas in the main area of the Gnome application widget. From the
properties dialog, set its maximal coordinates to 400 and its maximal
height and width to 400.
And now create a Gnome About Dialog. You can adjust its content from the
properties dialog in the Widget sheet.
All these widgets are in the Gnome category of the Palette.
Now remove the unused icon buttons and menu items. In the tool bar remove the
Open and Save icon buttons. Next edit the menu bar (right
click over it and choose edit menu) and remove all menus and menu items
except for File->New, File->Exit, Setting->Preferences
and Help->About.
Setting the widget and handler names
Apply the following names to these widgets so we can use them with theses
names in Python:
- Gnome Application Window:
- colorApp
- Gnome About Dialog:
- about
The handler names are function names to be called when an event occurs on a
particular widget. This means, we will define functions in Python using these
names - almost as you will see later. For example when the user clicks on the
new icon button we want to call a function to reset the game. To set this up
from Glade, you first need to select the widget, then adjust from the Signals
sheet in the properties dialog.
In our example, the signal is clicked and the handler is the
function name. The following arrays present all the used signal and handler:
In the about dialog:
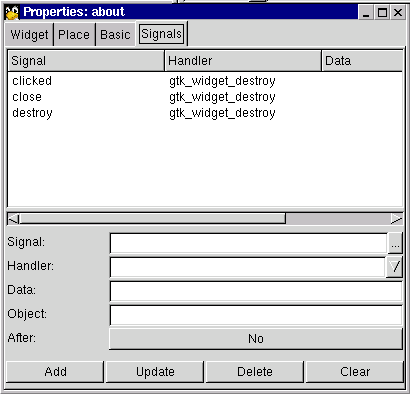
| Widget name |
Signal |
Handler |
| about |
clicked |
gtk_widget_destroy |
| about |
close |
gtk_widget_destroy |
| about |
destroy |
gtk_widget_destroy |
The gtk_widget_destroy handler is predefined in GTK. It just
destroys the widget.
In the colorApp window. First, Glade automatically chooses the
signals/handlers for items menu. You can check their names. I append them at the
end of this array. You will note that both new menu item and the new icon button
share the same handler, normal they have similar purposes:
| Widget name |
Signal |
Handler |
button1 (new icon button
on the toolbar |
clicked |
on_new_activate |
| new |
activate |
on_new_activate |
| colorApp |
destroy |
on_exit1_activate |
| exit1 |
activate |
on_exit1_activate |
| about1 |
activate |
on_about_activate |
The final touch
Call the Project Options from the Options button in the
Glade toolbar. In the General sheet, adjust the project entries as
below:
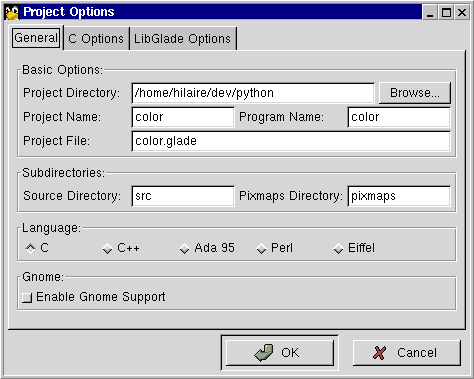
The file representing the widgets is color.glade. Adjust the path to
your own home directory.
Now save the file from the File menu. Do not build source code, we
don't use that feature.
We have now finish with Glade and we can now start with Python.
|